Before we get to that though, I have some more stuff to get off my chest. I've thought a lot about how I've started out this relationship. I may have claimed truth and honesty but I've begun to doubt that anything I said was really true or honest. I'm wondering what kind of impression I've made. I think I may have come across sounding like a hot shot. So, yeah, sometimes I think I am a hot shot. But maybe I should just be a little more patient and just let you get to know me and draw your own conclusions. Who am I to tell you who I am? Who really knows what they are like and can definitely say, "I am this way, blah, blah"? It's too absolute.
I know I like to go for the shock factor. I like to phrase things in concrete ways. But sometimes I really annoy myself. I feel exhausted after "putting on a show."
Ok, enough of that.
Here's what I found when I searched "diy cider press", "cheap easy cider press", "make your own cider press", "homemade cider press", etc. I also did image searches.
The Deliberate Agragarian has a
Whizbang Cider Press that you can order plans for:
He uses a scissor jack and a sturdy wooden frame. I like how he has a 2x6 on pegs so he has a built in blocking method to bring the pressing power right to where he needs it depending on how much pulp he's pressing. (All that's missing in the picture is the pressing basket.)
This one is from Dave Goddard that he posted plans for at
downsizer.net.
I really like the table top size and simple design.
Here's another simple design using some more common items. It is from a homebrew website called BrewingKB and was posted by sashurlow. Here's the
link.
They used cutting boards as separators between the cheeses (apple pulp wrapped in pressing cloth) an the white upright rods are made from clothes hangers. The pressing cloth used was no-see-um netting.
I also found a apple grinder and press made out of a converted washing machine. This is really neat and different. You would have to be somewhat unconcerned about efficiency, though. It doesn't get the most juice out of the apples but as far as time involved it sounds like a good alternative. I found it
here.
I have to show you this press, as well, because it was the most beautiful one I saw. I love wood and this guy used huge beams he had left over from tearing down a barn. I found it on
HomeBrewTalk (pretty handy website for cider brewing info, too).
The, hands-down, simplest press I found was the following one. The
website was really helpful, too, for cider making advice.
Ha! I've showed you so many you are not going to care about mine, now. Anyway, what I began to see was a pattern. Pretty simple, really. You need a heavy duty frame. You can use a bottle jack, a scissor jack or a tommy bar. You can make a pressing basket and line it with pressing fabric or you can make pressing plates and just layer cheeses of apple pulp wrapped in pressing fabric. It seems the best method I saw was using pressing plates layered between apple pulp inside a pressing basket lined with cloth. Now, since I already had my apples and wanted to get on with getting some juice to work with, I went ahead with what I had on hand and thought I'd come back to it later and make a pressing basket.
I went out to our garage and started pulling out what lumber we had left over from building a chicken coop. I found a few 2x4's and a 2x6. I wasn't sure what measurements would be best and and I thought the bigger the better but I was limited by what I had on hand. It is good for me to have limits! So, I cut the two 2x4's in half. I decided these would be the uprights. I cut the 2x6 in half as well. It already had a small piece cut off the end so my press didn't end up square but more rectangular. I used the 2x6 pieces as the horizontals. I laid my 6 pieces of lumber on the floor and clamped it and squared it and drilled holes in it for the bolts. I bolted it together and was extremely proud of myself and finished just as my husband got home from work. I had been out there for 4 hours and hadn't made dinner. Oops :)
Later, as my husband helped me fix my silly frame, he told me he was glad I had fun. This was said with a shake of his head as he was fighting with clamps and added layers of lumber. Lesson learned: it is far easier to drill ONE set of holes than try and line up and square more pieces later that need to be drilled. Yikes.
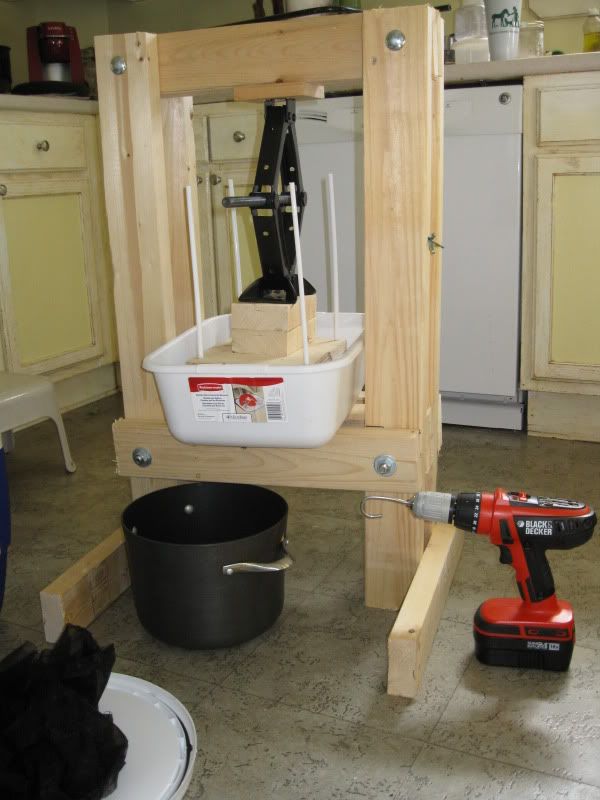
So, here's my final design:
The changes I made to my original design were to add another 2x6 horizontal board to each of the original top and bottom cross pieces. I also brought up the bottom to be one foot off the floor. And I added (well, sweet hubby did ;) two 2x4's to the bottom horizontal to widen it so that there'd be a sort of platform area. He put all of it together with metal rods that he threaded with an attachment he bought for the drill. Then he was able to put bolts and washers on. I think this was a cheaper option than trying to find really long bolts. We would have needed four 8" bolts for the top corners and four 12" bolts for the bottom. In the photo it looks like there is only one bolt through each bottom corner but what you can't see is another bolt below the 2x4.
So, that's all I have so far on the press frame. I'll write a separate post about actually pressing the apples.
I'm going to go check on my cider brewing experiment now. Heeeeee heeeee :) (I'm still sooooooooo excited about that!)