Sunday, November 18, 2012

Pressing the Apples

I got just over a gallon and a quart from pressing about 48 small to medium sized Golden Delicious apples.

The beautiful "seconds".


I chopped them before adding them to my food processor.


They needed a little encouragement to continue moving around enough to come in contact with the blades at first. I was able to do 8 at a time. I found this handy plastic child's chopstick set in my drawer. (I checked first to make sure it wasn't long enough to reach the blades.)


Here is what the apples looked like after chopping. I let the processor run until everything was moving smoothly and I couldn't see any large chunks of apple left.


I have a little stand and some jelly bags from my canning supplies so I let the pulp hang for a while. At this point I think it hung there for three hours or so while I was in the garage having fun trying to build the frame for my press. About 4 cups of juice drained out during that time. I have since learned that this leaves the pomace out exposed to the air too long and isn't good. Also, my son came along and decided to "help" the juice out by squeezing the bag with his sweet little 8 year old hands.


The picture below shows my awesome press in action. Well, it doesn't have all the proper parts yet. I used what I had in my kitchen to get me by until I finish it. One thing I did pick up was some Corian countertop pieces. I stopped by a local fabricator and asked if they had any scrap pieces. I ended up buying 5 sink cutouts for $15. I plan on grooving them. The Corian guy told me if I needed to cut them I should do it with a carbide tipped blade.


Above you will see the scissor jack partly covered with tinfoil (I thought it would help keep chunks of grease or whatever falling into the cider). The thing inside the plastic bag is a piece of firewood to bring the pressing power down to contact the Corian sink cutout. (I cut the ends of the firewood to square it as best I could.) In between the two pieces of Corian is the apple pulp which is inside the jelly bag pictured previously.

I think this worked well enough to keep up with the amount of pulp my food processor can put out. After pureeing three sets of 8 apples each (I did let it rest a little in between) it was feeling fairly hot.  I did the second batch of three sets of 8 apples each the next day. If I do end up with more apples I will definitely need to build an apple grinder :)

Friday, November 16, 2012

DIY Cider Press Frame

Before we get to that though, I have some more stuff to get off my chest. I've thought a lot about how I've started out this relationship. I may have claimed truth and honesty but I've begun to doubt that anything I said was really true or honest. I'm wondering what kind of impression I've made. I think I may have come across sounding like a hot shot. So, yeah, sometimes I think I am a hot shot. But maybe I should just be a little more patient and just let you get to know me and draw your own conclusions. Who am I to tell you who I am? Who really knows what they are like and can definitely say, "I am this way, blah, blah"? It's too absolute.
I know I like to go for the shock factor. I like to phrase things in concrete ways. But sometimes I really annoy myself. I feel exhausted after "putting on a show."
Ok, enough of that.
Here's what I found when I searched "diy cider press", "cheap easy cider press", "make your own cider press", "homemade cider press", etc. I also did image searches.
The Deliberate Agragarian has a Whizbang Cider Press that you can order plans for:


He uses a scissor jack and a sturdy wooden frame. I like how he has a 2x6 on pegs so he has a built in blocking method to bring the pressing power right to where he needs it depending on how much pulp he's pressing. (All that's missing in the picture is the pressing basket.)

This one is from Dave Goddard that he posted plans for at downsizer.net.


I really like the table top size and simple design.

Here's another simple design using some more common items. It is from a homebrew website called BrewingKB and was posted by sashurlow. Here's the link.


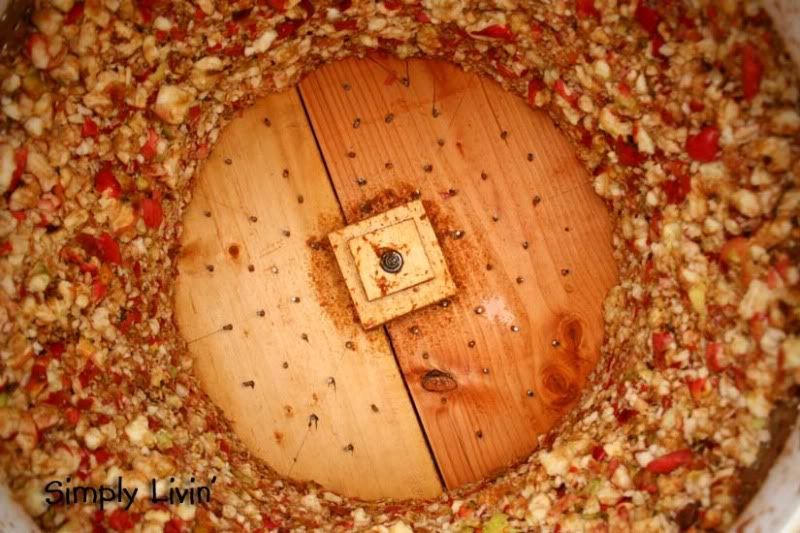
They used cutting boards as separators between the cheeses (apple pulp wrapped in pressing cloth) an the white upright rods are made from clothes hangers. The pressing cloth used was no-see-um netting.

I also found a apple grinder and press made out of a converted washing machine. This is really neat and different. You would have to be somewhat unconcerned about efficiency, though. It doesn't get the most juice out of the apples but as far as time involved it sounds like a good alternative. I found it here.


I have to show you this press, as well, because it was the most beautiful one I saw. I love wood and this guy used huge beams he had left over from tearing down a barn. I found it on HomeBrewTalk (pretty handy website for cider brewing info, too).


The, hands-down, simplest press I found was the following one. The website was really helpful, too, for cider making advice.


Ha! I've showed you so many you are not going to care about mine, now. Anyway, what I began to see was a pattern. Pretty simple, really. You need a heavy duty frame. You can use a bottle jack, a scissor jack or a tommy bar. You can make a pressing basket and line it with pressing fabric or you can make pressing plates and just layer cheeses of apple pulp wrapped in pressing fabric. It seems the best method I saw was using pressing plates layered between apple pulp inside a pressing basket lined with cloth. Now, since I already had my apples and wanted to get on with getting some juice to work with, I went ahead with what I had on hand and thought I'd come back to it later and make a pressing basket.

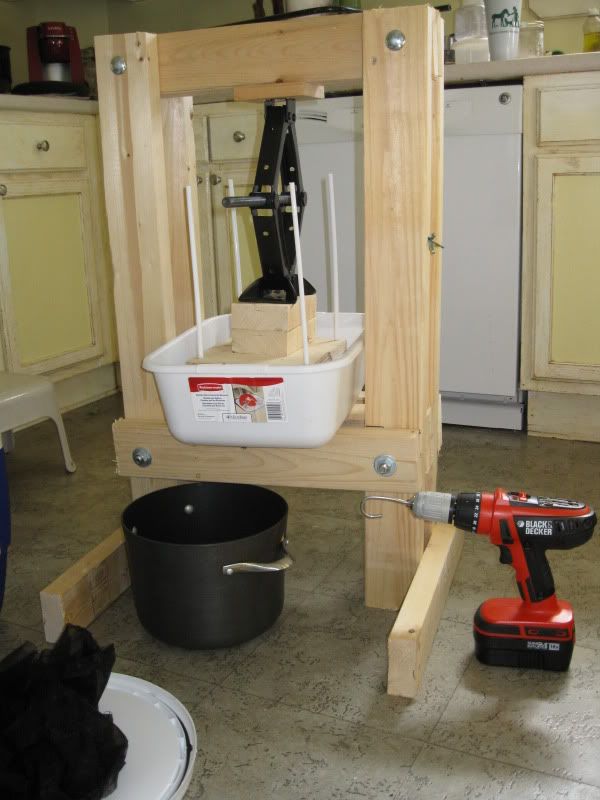
I went out to our garage and started pulling out what lumber we had left over from building a chicken coop. I found a few 2x4's and a 2x6. I wasn't sure what measurements would be best and and I thought the bigger the better but I was limited by what I had on hand. It is good for me to have limits! So, I cut the two 2x4's in half. I decided these would be the uprights. I cut the 2x6 in half as well. It already had a small piece cut off the end so my press didn't end up square but more rectangular. I used the 2x6 pieces as the horizontals. I laid my 6 pieces of lumber on the floor and clamped it and squared it and drilled holes in it for the bolts. I bolted it together and was extremely proud of myself and finished just as my husband got home from work. I had been out there for 4 hours and hadn't made dinner. Oops :)

Later, as my husband helped me fix my silly frame, he told me he was glad I had fun. This was said with a shake of his head as he was fighting with clamps and added layers of lumber. Lesson learned: it is far easier to drill ONE set of holes than try and line up and square more pieces later that need to be drilled. Yikes. 

So, here's my final design:


The changes I made to my original design were to add another 2x6 horizontal board to each of the original top and bottom cross pieces. I also brought up the bottom to be one foot off the floor. And I added (well, sweet hubby did ;) two 2x4's to the bottom horizontal to widen it so that there'd be a sort of platform area. He put all of it together with metal rods that he threaded with an attachment he bought for the drill. Then he was able to put bolts and washers on. I think this was a cheaper option than trying to find really long bolts. We would have needed four 8" bolts for the top corners and four 12" bolts for the bottom. In the photo it looks like there is only one bolt through each bottom corner but what you can't see is another bolt below the 2x4.

So, that's all I have so far on the press frame. I'll write a separate post about actually pressing the apples.

I'm going to go check on my cider brewing experiment now. Heeeeee heeeee :) (I'm still sooooooooo excited about that!)


Wednesday, November 14, 2012

Truth, Honesty and Cider!

I want to start off this blog on the right foot. With honesty. With clearly stated intentions. (Hopefully it will keep me on the right track.)
Ok, here goes...I am extremely selfish. I have two boys and a wonderful husband but I don't cook or bake for them unless I am hungry, you know what I mean?
I am also rather obsessive and tend to take things too seriously. I rarely do anything half-heartedly. I am also fairly arrogant and when I do something I usually think it's the best that there ever was. At least, it's the best in my situation. If you had the same circumstances as me you couldn't do it better.
I am also full of hypocrisies and juxtapositions. Like this:


Sometimes I'm the little girl making the perfect castle and sometimes I'm the obnoxious, sand kicker.  I've also noticed I tend to live one way inside my head and often my reality doesn't match up. Sometimes I see clearly my shortfalls and sometimes I am embarrassingly delusional.

Ok, now that that's out of the way (for now). I want to state my intentions. I intend to be honest and not give in to the bragging I want to do. If something goes wrong, I will tell you. I read a really good book recently by Kurt Timmermeister and what I loved about the author most was his honesty. He told it all; even the stuff that did not make him look good. I want to be like that.

Now, ON TO THE CIDER ADVENTURE! (yes, I am shouting) I am WAY too excited about this. (This is normal for me. I go from one obsession to the next.)

I live in apple country. We actually claim to be the Apple Capital of the world. I don't know how true that is with how many apples China produces but, whatever. We grow a lot of apples here. I was up at my local orchard a couple weeks ago and I picked up about a hundred pounds of Golden Delicious apples. They were mostly seconds and I got them basically for free. (I paid $5 for the good ones and they gave me three 5 gallon pails of the seconds.) I made some apple pie filling, I made some apple sauce. Then I decided to juice them. When I was researching how to make a cider press I found how to make hard cider. I read a lense on squidoo by JellyGirl1. It sounded too easy not to try.

It took me a couple days to press a gallon of cider (I was in the middle of researching and making my press, too). I finished on Nov. 10, 2012.

I've decided to post separately about pressing the apples.

I went to my local homebrew store which is an awesome store called Stan's Merry Mart and purchased all the supplies I thought I'd need for $24.21.


Two glass gallon jugs ($5.47 each), 2 rubber stoppers ($1.29 each), 2 airlocks ($.79 each), 2 caps ($1.29 each), yeast ($0.99), campden tablets ($1.29 for 25) and a 2.3 feet of food grade tubing at $.49/sqft (I should have bought a longer piece).

The first recipe and method I am trying is:
1 gallon of cider;
1 campden tablet; and a
1/2 a packet of Red Star® Pasteur Champagne yeast (I accidentally added a little more than half).

Here is my hard cider journey:

DAY 1
On Nov. 12 I pitched (it means added) the yeast. This was after waiting for 48 hours after adding the campden tablet which kills all the wild yeast, etc. I sanitized the airlock and stopper in vinegar for a few minutes and rinsed it with clean water. I don't even know if the vinegar does a good enough job of sanitizing but that's what I did.


On the back of the yeast packet it said to add the yeast to warm water but I didn't want to dilute the cider so I poured out some of the cider and warmed it.
Then I inserted the stopper and filled the airlock with water (some use vodka but I didn't have any) to the fill line an put that in the stopper.

Here's Day 1's official photo:

DAY 2
In the morning I noticed bubbles coming out of the airlock. I was so excited. They weren't very frequent but it meant that the yeast was alive and kicking!  I climbed up on a stool to see little bubbles coming up through the cider.


photo taken at 8:39 am on Nov. 13, 2012.

Later on on Day 2 I started wondering if I should store the cider somewhere dark so now it lives in my son's closet. Just in case it explodes it will go all over his stuff and not mine. :) he he

So, now I will go and check on the experiment and take Day 3's photo.